[section label=”Introduction”]

Several years ago, we published our first SSD Optimization Guide for Windows 7, which was very popular among our readers. At the time, SSDs, or Solid State Drives, were still a relatively new product and while Windows 7 had a number of optimizations for SSDs built in, there were still quite a few things to tweak to achieve the best performance and the longest lifespan out of the SSD.
With Windows 10 however, things are a bit different as SSDs are now a relatively well known technology with years of development behind them. They’ve also seen mass adoption recently thanks to huge growth in the tablet and ultraportable notebook market. As such, Microsoft’s latest operating system, Windows 10, now enables most of our previously recommended SSD optimizations by default, so we’ll take this opportunity to not only talk about the relevancy of previously recommended optimizations, but also share some general advice on SSD best practices.
[section label=”Optimize Drives”]
1. Optimize Drives
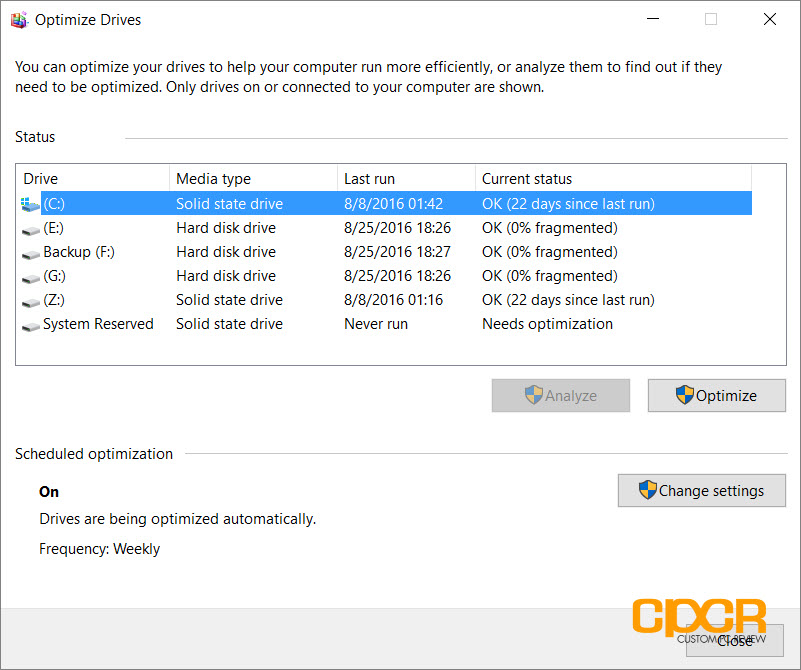
With Windows 10, Microsoft added the Optimize Drives feature which runs the TRIM command on your SSD to ensure that it’s being done. TRIM ensures that deleted files are wiped from the SSD so that future incoming writes will perform at peak levels. Using the Windows Optimize Drives utility, this may be scheduled to be done automatically on a daily, weekly, or monthly basis.
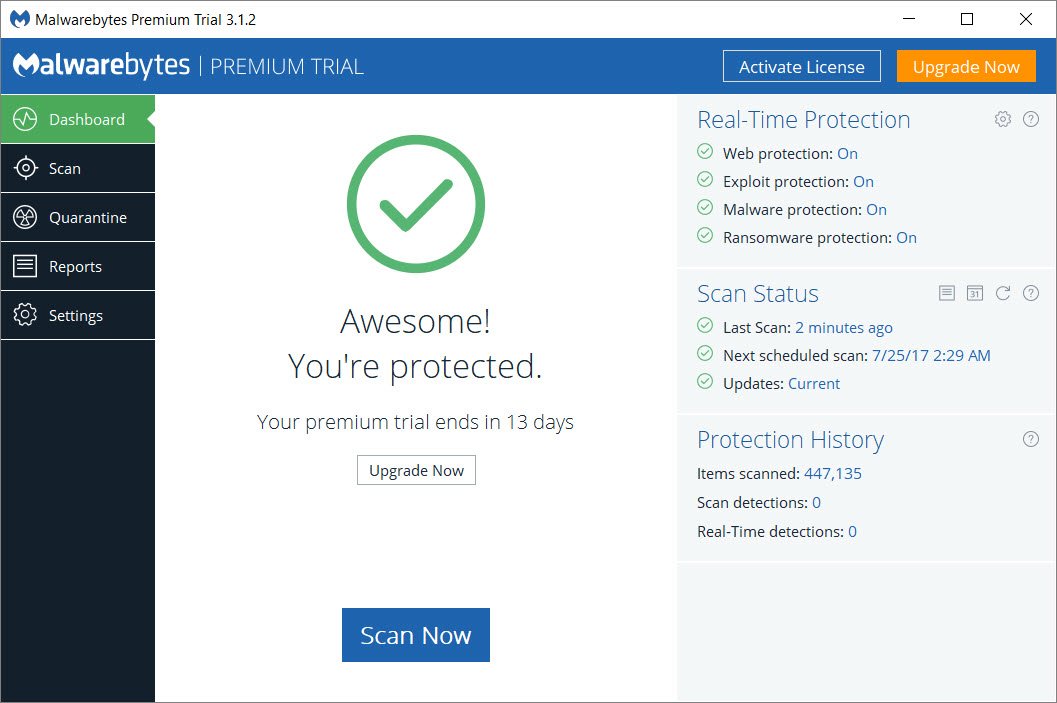
Here’s how to check whether Windows is optimizing your SSD.
- Click Start
- In the search bar type ‘Defragment and Optimize Drives’
- Click ‘Defragment and Optimize Drives’
- Highlight your SSD
- Click ‘Optimize’
[section label=”Update Drivers”]
2. Update Your Drivers
One of the most common reasons I see for slow SSD performance is outdated drivers. While it’s not necessary to update the native Windows AHCI drivers for SSDs to work, updating the drivers with Intel RST (for Intel-based systems) could provide a big performance benefit.
Where I tend to see the biggest performance benefit is for the high end PCIe SSDs as the Windows native NVMe driver is slow at best. Finding and installing drivers is as easy as visiting the manufacturer’s website.
[section label=”Update Firmware”]
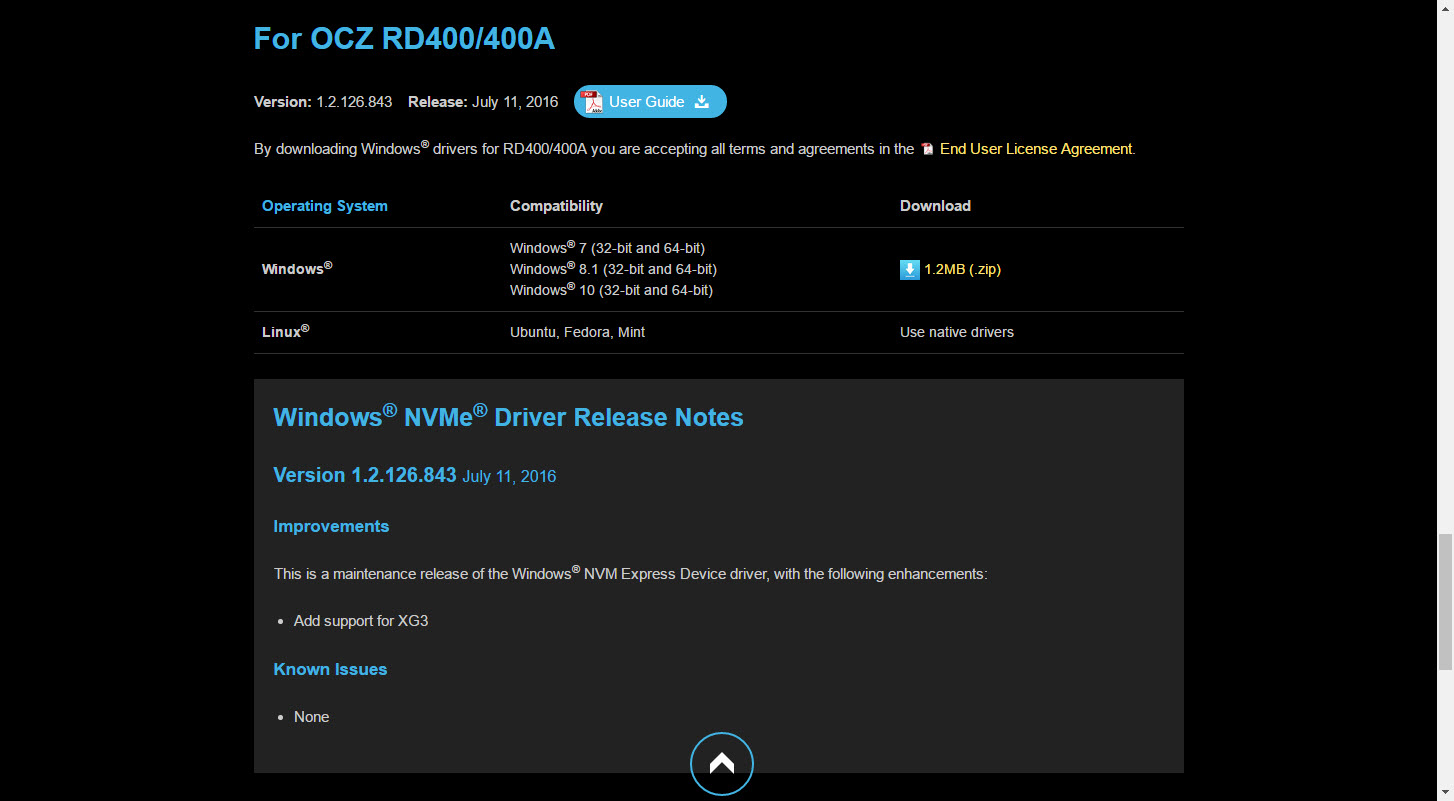
3. Update Your Firmware
Just like every other piece of computer hardware you own, updating the firmware on your SSD is important as new bugs and problems get identified and resolved. This may significantly improve your drive performance, improve drive stability, or improve compatibility with your system, so definitely update your firmware if needed. To do so, first identify the firmware running on your SSD. This may be achieved with Crystal Disk Info which may be found here.

Then simply go to the manufacturer’s website to see if newer firmware exists for your SSD. If so, instructions on updating your firmware should also be included with the specific SSD you have.
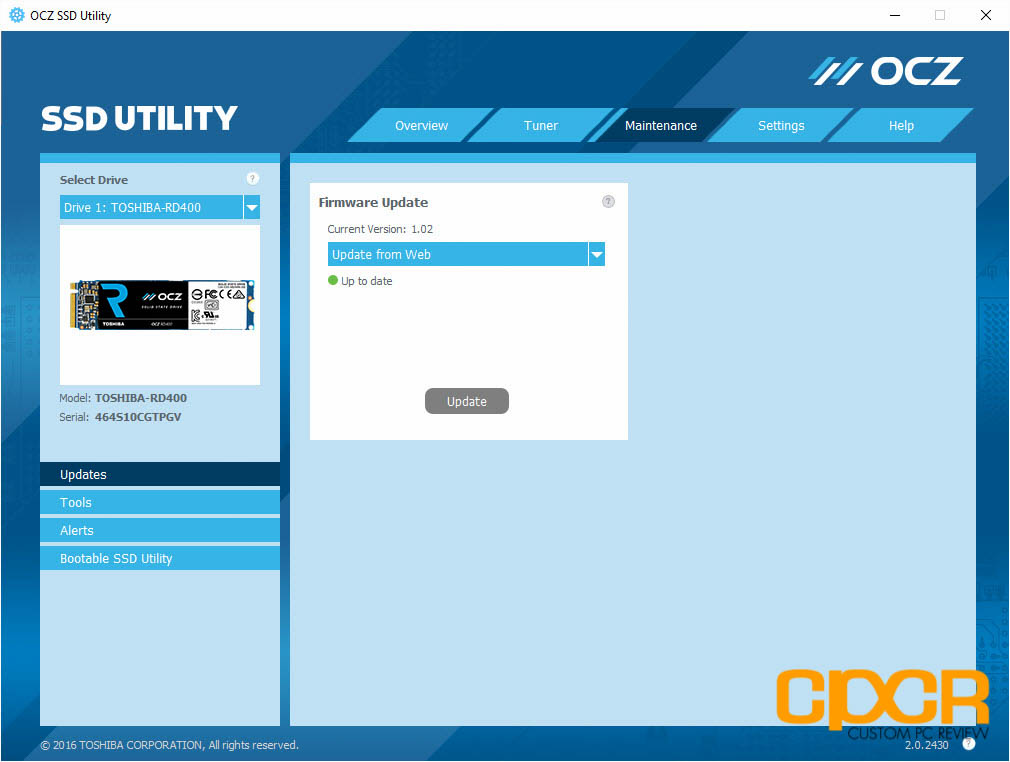
Most SSD manufacturers also offer a software utility with their SSDs for easy firmware updating. Be sure to install the SSD software in order to access this feature.
[section label=”Use AHCI”]
Older SSD Optimizations
Since we’ve already published a SSD optimization guide previously, let’s review each of those optimizations and discuss their relevancy today.
1. Ensure your SATA ports are configured to use AHCI mode in BIOS
Still relevant? Yes, but typically on older systems
Generally, the SATA interface can be toggled to work in either IDE (Integrated Drive Electronics) or AHCI (Advanced Host Controller Interface) mode. AHCI mode will run significantly faster so it’s important that your SSD is running in this mode. In older systems, the BIOS may default the SATA ports to IDE mode, but in newer systems, it should default to AHCI mode.
If you’re running an older system and upgrading to a SSD, be sure to check to ensure you’re running in AHCI mode for best performance. As all motherboard BIOS/UEFI systems are slightly different, consult your motherboard manual on how to do this or request some help from our community forums. Be sure to enable AHCI mode PRIOR to installing Windows or you may end up with a BSOD as soon as you change the mode.
Those running PCIe SSDs do not need to do this.
[section label=”Enable TRIM”]
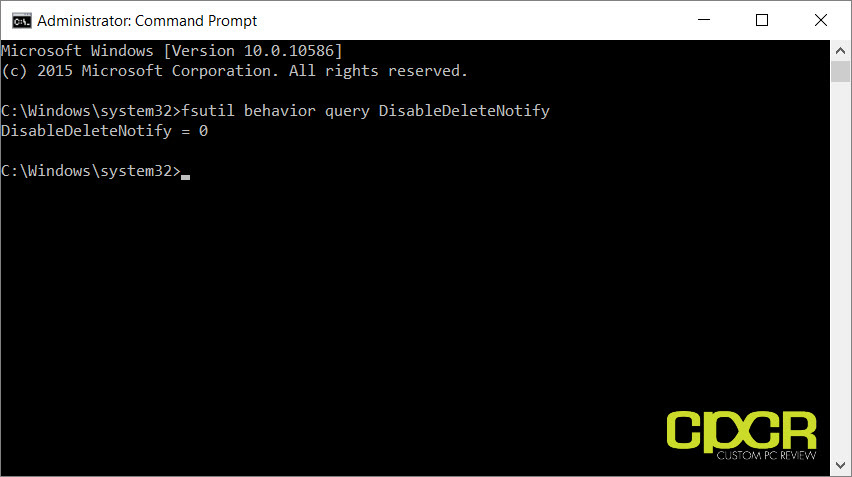
2. Enable TRIM
Still relevant? Not really, but make sure it’s running
TRIM is a command developed specifically for SSDs to tell SSDs to wipe out deleted data to improve performance the next time data is written. With Windows 10, TRIM should be enabled by default for SSDs, so this shouldn’t be a problem.
However, since it’s super easy check whether TRIM is enabled, I’d still highly recommend checking. Here’s how to do it.
- Click Start, in the search bar type “cmd”, right click “Command Prompt” and click “Open as Administrator”
- Type “fsutil behavior query DisableDeleteNotify” without the quotes
- If you get DisableDeleteNotify = 0 then TRIM is working. If you get DisableDeleteNotify = 1, then simply type “fsutil behavior set disabledeletenotify 0” without the quotes to enable TRIM.
[section label=”Disable PageFile”]
3. Disable PageFile
Still relevant? Depends
Previously, the biggest benefit of disabling the pagefile was simply to free up the storage space reserved for the pagefile. With SSD prices now hovering in the $0.20-$0.30/GB range, it’s much more affordable than ever to purchase 256GB or higher capacity SSDs. If you’re still rocking a 64GB SSD or smaller, I’d still recommend disabling the pagefile for storage if you have greater than 4GB of onboard memory, but if you’ve got an appropriately sized SSD, it’s not worth the effort.
[section label=”Disable SuperFetch”]
4. Disable Superfetch and Prefetch
Relevant? No
With the introduction of Windows 8 and Windows 10, SuperFetch, Prefetch, ReadyBoost is automatically disabled on SSDs by default making it no longer necessary to disable these features.
[section label=”Disable Indexing”]
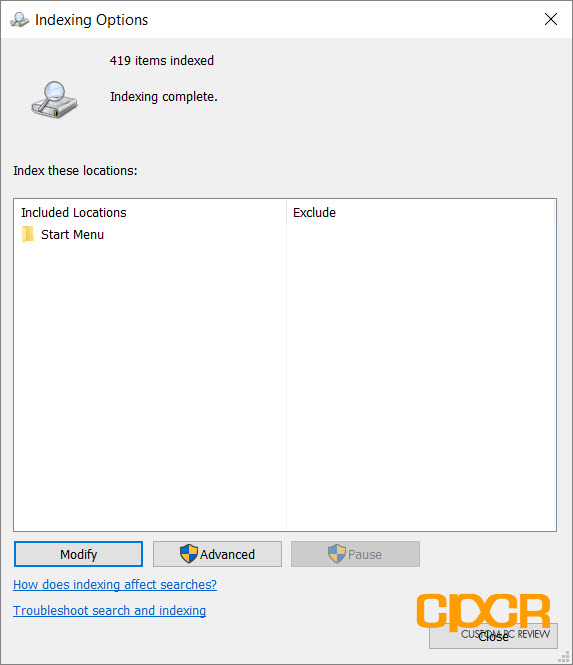
5. Disable Indexing
Relevant? Depends
Previously I recommended simply disabling the Windows File Index entirely and calling it a day, but it’s much easier to simply adjust what Windows Indexes through the Index Options. This way you can simply index files that you want indexed such as files stored on a hard drive or very frequently accessed files on your SSD.
Here’s how to access your Indexing Options.
- Click Start
- In the search bar search for ‘Indexing Options’ and click on it
- Click on ‘Modify’
- Choose which directories you’d like indexed
- Click OK
[section label=”Disable System Restore”]
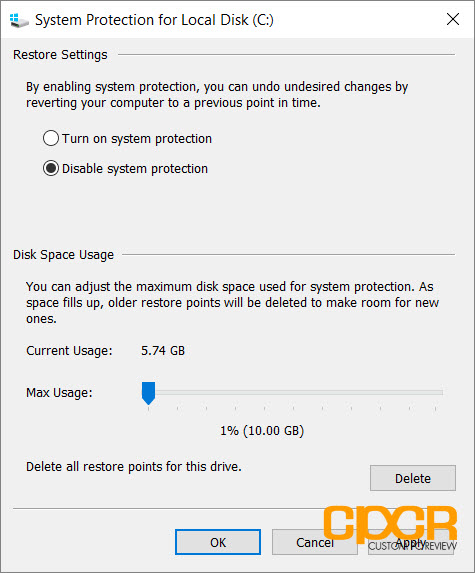
6. Disable System Restore
Relevant? Depends
Like disabling the pagefile, the biggest benefit to disabling system restore is getting back some storage space. However, with SSDs coming down significantly in price, setting aside some storage space for system restore is no longer as much of an issue as with 64GB or smaller SSDs. If you’re still one of those rocking a smaller capacity SSD, this might be a great way for you to free up a couple GB worth of data.
Here’s how to disable system restore.
- Right click Start
- Click System
- Click “System Protection”
- Highlight your SSD (Usually Drive C:)
- Click “Configure”
- Click “Disable system protection”
- Click Apply
- Click Yes when prompted
[section label=”Disable Hibernation”]
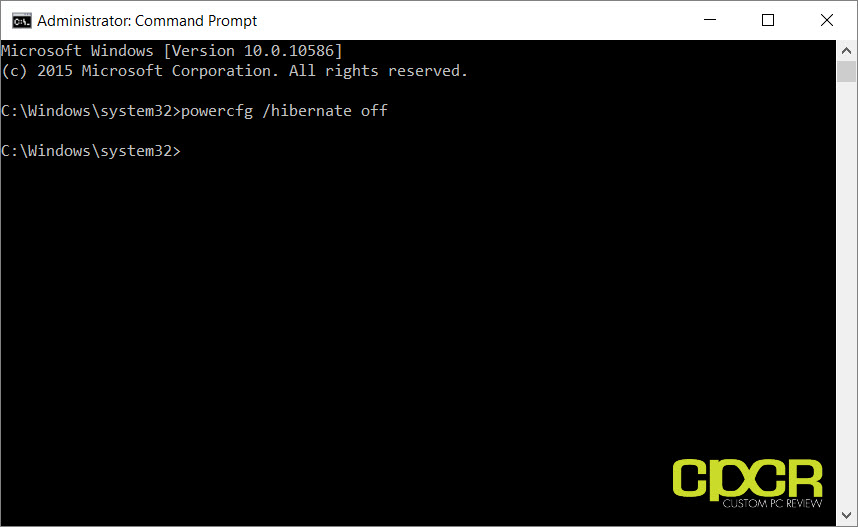
7. Disable Hibernation
Relevant? Depends
On the same token as disabling the pagefile and disabling system restore, disabling hibernation is another one of those tricks to help you free up some drive space. Unlike standby mode which most of us are familiar with, hibernation mode allows a system to go into deep sleep by storing your Windows session in primary storage rather than DRAM. This unfortunately will require some storage space and could be an issue if you’re running out of drive space.
Disabling hibernation is easy. Here’s how to do it.
- Click Start
- In the search bar type “cmd”
- Right click “Command Prompt” and click “Run as Administrator”
- Type “powercfg /hibernate off”
[section label=”Disable Windows Write Cache Buffer Flushing”]
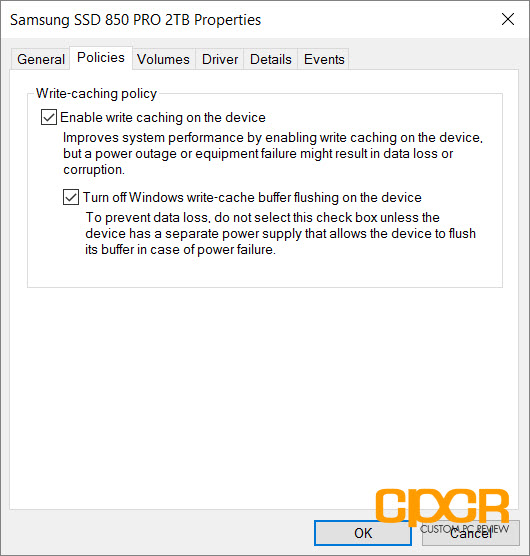
8. Turn off Windows Write Cache Buffer Flushing
For those who like to live on the edge, turning off the Windows write-cache buffer flushing will prevent Windows from waiting for the buffer to flush to the drive before writing additional data. While this may provide a performance boost, it has a good chance of causing Windows corruption if the system experiences sudden power loss or some sort of random shutdown.
If you have a laptop with an integrated power supply or a desktop running on a UPS and are looking for maximum performance above all else, you can consider doing this. Otherwise, I’d recommend not turning off Windows write-cache buffer flushing.
Here’s how to disable Windows write-cache buffer flushing.
- Right click Start
- Click ‘Device Manger’
- Click ‘Disk Drives’
- Right click your SSD
- Click ‘Properties’
- Click ‘Policies’ tab
- Tick ‘Turn off Windows write-cache buffer flushing on the device’
[section label=”Conclusion”]
Conclusion
Windows has gone a long way since the days of Windows XP and Windows 7, and Microsoft has done a lot of work under the hood to ensure that SSDs operate at their best performance. As the SSD evangelist that I am, I get plenty of questions on how to ensure SSDs are performing at their best and hopefully this article answers some of those questions. If you have additional questions, feel free to swing by our community forums for additional help.
Did this article help you? SSD experts out there, do you know of any additional optimizations? Let us know in the comments below!


Well, this can be very useful, thanks.
Can I also optimize SDD on my Macbook?
I’m not super familiar with Mac, but it should be fairly well optimized to work with the SSDs it ships with right out of the box.
Never. Ever. Disable paging file. Myth debunked so many times. I don’t care if you have 64gb of RAM you still need a paging file
Why?
I disabled mine and 6 months later no problems.
Disable since begining of our era. No problema. Paging file was created to use disk space as RAM, a very low one in case you fill up your RAM. Remember that RAM was very small in old times Since we got big RAM modules and RAM is cheaper that problem does not exist.